Saturday, December 11, 2010

Day 6 - Peanut Blossoms


Ok...EVERYONE has had this cookie. This recipe makes 7 dozen and is pretty true to the amount. The worst part of making this one is unwrapping the Hershey Kisses. I wish you could buy them bulk and UNWRAPPED!!! :) Helpful hint...make early in the day as it takes FOREVER for the kiss to firm up once added to the cookie.


This came from a good friend, Kay Magnin, who I worked with many years ago at the VA Hospital in Madison.
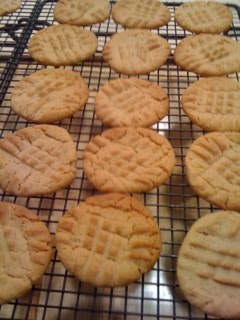

Peanut Blossoms


1 C solid vegetable shortening

1 C peanut butter (usually creamy)

1 C granulated sugar

1 C brown sugar

2 eggs

2 tsp vanilla

1/4 C milk

3 1/2 C flour

2 tsp baking soda

1 tsp salt

2 9oz bags of Hershey Kisses


Preheat oven to 375 degrees. In a large bowl, cream together the shortening and peanut butter. Add sugars, eggs and milk...mix well. Add vanilla and mix again.

Sift together the dry ingredients (flour, soda, salt) and add to creamy mixture. Shape into 1 tsp size balls of dough. Coat in granulated sugar and place on greased cookie sheet (or do like me and use ungreased parchment paper). Bake 10-12 minutes or until brown. Remove from oven and press chocolate kiss into each cookie. Allow to cool completely.

Day 5 - Sugared Pecans and Almonds


Took a break from cookies today to do another favorite Christmas treat. This recipe is courtesy of my mom. Every Christmas, she makes these and they are consumed at lightening speed! Her recipe only called for pecans, but I wanted to try almonds too. If you like those sugared nuts they sell at baseball parks and fairs, you will LOVE these.


Sugared Pecans and Almonds


1 egg white

1/2 C packed brown sugar

1 tsp. vanilla

2 tsp cinnamon

4 C pecans, almonds or nut of your choice

parchment paper


Preheat the oven to 325 degrees. Line a cookie sheet with parchment paper. Beat the egg white until stiff. Add the brown dugar, vanilla and cinnamon. Stir until well mixed, then add the nuts. Continue stiring until the nuts are coated. Pour out onto prepared cookie sheet.

Bake 10 minutes. Remove from oven and stir again. Repeat two more times (bake/stir) or until the nuts have a dry look to them and are slightly browned. Watch carefully so they don't burn. Remove from oven. Let cool completely before packaging.

Thursday, December 9, 2010

Day 4 - Coconut Macaroons


I have been doing Christmas baking since I can remember (except last year when we lived in a tiny apartment). This is the gift I give my family and friends...an assortment of homemade cookies, candy, preserves and snacks. I guess I'm "old-fashioned" in that I want to give something to them that is special...an expression of my love for them. Some of you probably think this is a LOT OF WORK, but for me, I can say in complete honesty that it is a pure JOY to spend time in the kitchen, concocting something wonderful to eat for those I care for.


Ok...on to the next "goodie". If you are a fan of Mounds bars, this one's for you. This has to be the EASIEST cookie ever! Six ingredients, no creaming the butter...in fact I don't even use a mixer...just my hands. The boys gave it a BIG "thumbs-up" last night and I will be dipping one half in melted semi-sweet chocolate yet (the night got away from me last night). The one thing that is different about this than other cookies is that you bake them longer in a cooler oven. That being said, they are truly worth the baking wait time.


Baker's One Bowl Coconut Macaroons (courtesy of Kraft foods website)


1pkg (14oz) Coconut

2/3 C sugar

6 TBSP flour

1/4 tsp salt

4 egg whites

1 tsp. almond extract


Preheat oven to 325. Grease and flour baking sheets or do as I did, line your baking sheets with parchment paper (no need to grease or flour and you can use over).


Combine coconut, sugar, flour and salt in a large bowl. Stir in egg whites and almond extract. Mix until well blended (I used my hands). Chill for 1-2 hours (makes it easier to work with)


Drop about 1 TBSP coconut mixture into mounds about 2 inches apart (these will NOT spread).


Bake 20 minutes or until edges are golden brown. Immediately remove from baking sheet to wire racks (I slid the parchment paper off the cookie sheet onto the counter for cooling). Store in a tightly covered container at room temperature up to 1 week or keep cold (freeze or as I do, store outside) until you want to serve them.


Like I said, I like to melt chocolate (dark, semi-sweet or the like) and dip half in the chocolate once the cookies have cooled.

Wednesday, December 8, 2010

Day 3 - Chocolate Crinkles


This cookie is Alex's FAVORITE! It's a cake-like cookie with a chocolate surprise (i.e. chocolate chips). You could easily change this up by adding mint chocolate chips, dark chocolate chips, high end cocoa powder, etc...


Every year, I wonder why the powdered sugar melts away and the cookies look so-so. As only the "scientist" in me would do, I discovered an article on how to remedy that! It appears that a chemist has found the secret to making the powdered sugar stick and not melt while baking. http://www.npr.org/templates/story/story.php?storyId=98275947. I did that and they turned out MUCH better!


Chocolate Crinkles from Family.com


3/4 C Butter melted

1/2 C Unsweetened cocoa

1 C Granulated sugar

2 Large eggs

2 tsp Vanilla

2 C flour

1 tsp Baking powder

1 tsp Baking soda

1/2 tsp Salt

6 oz chocolate chips

Powdered sugar

Granulated sugar


In large bowl, mix melted butter, cocoa and granulated sugar. Beat in eggs and vanilla until well blended. In a medium bowl, mix flour, baking powder, bakin soda and salt. Slowly, mix the flour mixture with the wet indgredients, then stir in the chips.

Refrigerate 2-3 hours.

Preheat oven to 350. Form dough into 1-inch balls and roll into granulated sugar first, then powdered sugar. Bake on ungreased baking sheet for 12 minutes. Let set 5 minutes before removing from cookie sheet.


Tuesday, December 7, 2010

Day 2 Cream Cheese Spritz Cookies


Spritz cookies are quick and easy to make...especially if your cookie "gun" cooperates! I use the Pampered Chef cookie press for mine. Something I learned this year is that it's best NOT to press them to parchment paper, but directly on an ungreased cookie sheet. You get funky looking cookies when pressing to parchment.


There are tons of ways to decorate these cookies too... Colored sugar, sprinkles, add food coloring to the dough, the possibilities are endless. This year, I opted for multi-colored sprinkles on the trees, blue ornament-like cookies with silver or gold balls, and a red sugar sprinkle on what looks like a flower shape.


FYI...I double the recipe.


Cream Cheese Spritz Cookies from Fine Cooking Holiday Baking Winter 2004


1C butter softened at room temperature

3 oz cream cheese softened at room temperature

1C granulated sugar

1 lg egg yolk

1tsp vanilla extract

11.25 oz (2 1/2 C) flour

Colored sugars or other decorations for sprinkling (optional)


Preheat oven to 375.


Beat butter, cream cheese and sugar on medium speed until light and fluffy, about 4 minutes. Add egg yolk and vanilla and beat again until blended. Add flour and mix on low until well blended.


Follow directions of cookie press and press cookies onto ungreased baking sheet about 1 inch apart. Bake until just golden around the edges...10 - 12 minutes. Let the cookies cool on the bakin sheet for 5 minutes before transfering.


Store at room temperature or freeze in an airtight container, separating the cookie layers with wax paper.

Monday, December 6, 2010

14 Days of Cookies!


So, I've been a slacker and haven't posted in awhile....Sorry!!! Thought you might enjoy my "14 Days of Cookies". Each day, I'm making a new Christmas treat.


Day 1 - Andes Creme de Menthe Cookies. Got this recipe from one of the stylists at Heidi Christines Day Spa in Ada.


Recipe:

1 pouch Betty Crocker Sugar Cookie Mix

1 egg

1 stick butter

1/4 tsp peppermint extract

6-8 drops green food coloring

1 C Andes Creme de Menthe chips

1 C Semi-sweet chocolate chips


Mix egg, butter, cookie mix, extract and food coloring until well blended. Add chips and mix well. Use a small spoon and drop spoonfuls onto cookie sheet. Bake at 350 for 7-9 minutes.

Sunday, June 27, 2010

Old-fashioned Peanut Butter Cookies


It's another soggy day here in West Michigan. Seems like a good day to bake! I've been craving peanut butter cookies for weeks. The question is which recipe to use??? I surfed the web, combed through my cookbookds and decided on the "infamous" Better Homes and Gardens New Cook Book. I'm sure you would recognize it with it's red and white cover which reminds me of a summer tablecloth. I can't find a copyright date, but the pages are yellowed so I think it's fairly old.


I don't know how you like your cookies, but I prefer mine overdone. My family, on the other hand, likes them soft and chewy. I thought I would experiment with the baking time on my convection oven to see if I can find a happy medium.
Batch number one was baked at 10 minutes. Turned out soft and chewy.

Batch number two was baked for 13 minutes. Much more to my liking.


Recipe
Preheat oven to 375 degrees

2.5 Cups flour
1.5 Tsp baking soda
1/2 tsp. salt
1 Cup butter or margarine (I ALWAYS bake with butter)
1 Cup peanut butter
1 Cup granulated sugar
1 Cup packed brown sugar
2 eggs
1 Tsp. vanilla

Stir together flour, soda and salt. In a mixer bowl, beat butter for 30 seconds. Add peanut butter and sugars; beat until fluffy. Add eggs and vanilla; beat well. Add dry ingredients to beaten mixture; beat until well combined. Shape dough into 1-inch balls and place 2 inches apart on ungreased cookie sheet. Crisscross with the tines of a fork. Bake at 375 degrees for about 10 minutes. Cool 1 minute before removing to a wire rack. Makes 80 cookies.

Sunday, June 20, 2010

NY Strip Steaks with Bleu Cheese Butter and Mushrooms


So, I'm back in Wisconsin for the week. Val and I picked up our boys from camp yesterday and are without husbands until Friday. Brett and Alex had a Nerf party to attend so I decided that we girls would have a great dinner instead of pizza or cereal! Here's the first of many recipes I hope to share with you. This comes courtesy of my classmate, Nancy Troyanek. We paired the steaks and mushrooms with a colorful and well-seasoned veggie packet as well as an awesome 2007 Le Clos Millesime red wine.


Commentary about the recipe:


  • First, I was REALLY NERVOUS about using 2 TBSP fresh minced garlic for the steak rub but I did it anyway. Don't skimp on the garlic as it did not overpower the steak. The flavor the rub added to the steaks was outstanding.


  • Steaks need to rest at room temperature once coated with garlic/thyme mixture for 1 hour.


  • I must admit, I'm not a bleu cheese lover and wasn't sure if I would like the butter mixture. I've gradually been working my way to acquiring a taste for it. First by trying feta, then gorgonzola. The bleu cheese butter was TO DIE FOR!!!!


Ingredients:

  • 2 NY strip steaks cut 1-inch thick (about 12 oz)


  • 2 TBSP fresh thyme, chopped


  • 2 TBSP garlic, minced


  • 1/2 tsp pepper


  • 4 medium portobello mushrooms, stems removed


  • 1/4C olive oil

Bleu Cheese Butter:

  • 1/2C crumbled bleu cheese


  • 1/4C butter softened


  • 3 TBSP rehydrated sun-dried tomatoes, not packed in oil, chopped


  • 1 TBSP fresh parsley, chopped

Veggie Packet:

  • Summer squash, zucchini, sweet onion, red bell pepper and any other veggies you care to throw in that would cook about the same.


  • olive oil


  • seasoning of your choice (I use my uncle Jacks Vegetable and Egg seasoning)

Directions:

  1. Combine thyme, garlic and pepper in small bowl. Press evenly onto steaks. Set aside at room temp for one hour.


  2. Combine Bleu Cheese butter ingredients in small bowl until well blended.


  3. Slice your favorite summer vegetables. Make a tin-foil packet and drizzle foil with olive oil. Add veggies and drizzle with olive oil and your favorite seasonings. Grill for 10-15 minutes.


  4. Brush mushrooms with oil. Move veggie packet to shelf of grill or remove from heat all together. Place steaks in center of grill over medium heat. Arrange mushrooms around steaks. Grill steaks 11-14 minutes for medium-rare to medium doneness, turning once. Grill mushrooms 16-18 minutes until tender, turning occasionally.


  5. Remove steaks, mushrooms and veggies from grill. Spread Bleu Cheese butter over steaks and serve.


This was super easy to make! Both Val and I felt like we were eating at an expensive steak house as far as the quality of the dinner. Mike and Mike...I'll make it for you one night too!

Enjoy!!!

Friday, June 18, 2010

My Kitchen


To get started, I thought I share my kitchen with you. When it came time to design, I put A LOT of thought into what was important to me as a cook.
  1. Sink with a view.
    Growing up, we had a sink with a window and it seemed to make washing dishes a much more pleasant task. I don't exactly have a window, but I do look out of the kitchen onto our deck which backs up to a gorgeous tree line. Our builder's wife had picked up a discontinued farm sink for $200.00 which I eagerly took off her hands!

  2. Double ovens.
    Thanks, again, to my mom because the kitchen I grew up in had double ovens. For those of you who don't know me, at Christmas I go CRAZY baking cookies for my family and friends. This was a must have! I was only familiar with gas ovens and these ovens are convection which takes some getting used to. I can tell you this...muffins and quick breads raise higher in a convection oven.

  3. A forgiving countertop.
    When we remodeled our kitchen in Waunakee, we put in a Corian-like countertop. While it was beautiful, it scratched easily. Just wiping up spilled sugar scratched the surface. Being a baker and enjoying the challenges of cut-out sugar cookies at Christmas, I opted for a butcher block surface on my kitchen island. I figured I could knead bread dough, roll pie crust and cut cookies without feeling like I was destroying it. Besides, isn't butcher block supposed to look "used"?!?!? For the rest of the kitchen counters, we chose a quartz called "abyss black". Looks great against the white cabinets.

  4. Gas range or cooktop
    I have cooked with both gas and electric ranges and prefer to cook using gas. This appliance also had to have a griddle since Mike is "king of the pancakes" which Alex pretty much demands every weekend. That being decided, the next BIG decision was what brand. I had friends who had Viking and Wolf and who were satisfied with either. After much research, I decided on BlueStar. Now, it's not as well known as the other two, but here's how it got my attention. First, it has two burners that heat to 22,000 BTU. What do I need that for you ask?!?!? Well, I like to can and don't want to be doing it all day! Get my waterbath boiling so I can get out of the kitchen!!! Secondly, high heat is a MUST for searing steaks and seafood. The BlueStar also has a simmer burner for tempering chocolate or whatever else you do with low heat. This came in VERY handy when I canned strawberry jelly last week as it kept the seals sterile.

  5. A walk-in pantry
    As you see in my opening blog post, that is me in my pantry. There is little food located in the kitchen. I have a cute bread drawer and a drawer with flour, sugar, baking soda and powder, and vanilla. That's it for staples. Everything else is stored in the pantry. You probably also noticed the wine cubes. Our carpenter, Jamie, made those from a picture I found on the Internet. He even built me a frame so we could frame a section of the wall we painted with chalkboard paint. Great way to keep a list of what's needed for the pantry!


  6. Efficient cabinetry
    Wasted space is the enemy of anyone who likes to cook! Base cabinets, in particular, can be wasteful. Our cabinets all have pull-out drawers so you can easily FIND and get to what you need. We also used more pull-out drawers than cabinets. I organized the kitchen in sections...baking, cooking, prepping, and storing. Gone is the unwieldy Tupperware cabinet!!!
I'll get some more pictures of some of these things in the coming weeks. This at least gives you an idea of where I do my creating! It's really nothing more than a glorified chemistry lab!!! :)

Welcome to my blog!


Welcome to "In the Kitchen with Karen". I consider myself a "retro" mom...one that continues to perpetuate the art of cooking and baking in a world of processed food, meals on the run in the car and lost family dinners at the table. Enjoy my posts and I look forward to getting to know other cooks and bakers out there!